Machine Embroidery Needles 101
Understanding the differences between machine embroidery needles and knowing which needle to use for each project will go a long way in developing your skills as a proficient commercial embroiderer.
FULL STORY
(Editor’s Note: This article is the second in a four-part series on realistic designs. View Part 1, which covered digitizing realistic landscapes.
Designs often use thin outlines to create detail. This works for print, but is not practical for embroidery. Try convincing your client to drop these outlines. When you have outlines, you are more likely to let the outlines do all the thinking for you; your designs are more likely to be flat and underwhelming. Instead, let stitch type and direction create detail. While it may require a little more work, it’s a great way to impress an important client.
Note: The following examples involve left-chest sized images and Wilcom embroidery software.
Pine Trees (Conifers)
The main characteristic of pine trees is that it is a needle-bearing tree and does not have leaves.
A row of pine trees can be done several ways. One approach is to use a complex fill stitch going vertical or near vertical and adding random pattern to it. In Pulse, use the fill stitch labeled Random. In Wilcom, you will have to go into the settings in Tatami and change the A pattern to .5 and the B pattern to 0. Add 15% to 80% to Random.
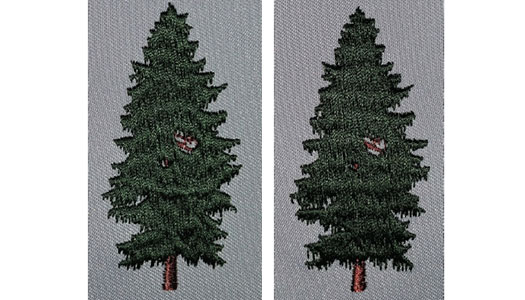
You can add even more depth by dividing the clump of trees into several rows of the same stitch fill, one on top the other. Another simple but impressive method is to use satin stitch with Auto Split Stitch on (known as random split stitch in Pulse). Feel free to turn it down from the standard 7 mm until the split sections look even with the bottom of the branches (Fig. 1 on the left above).
On individual trees that are the focus of a design, you may want to create more detail. First of all, even though you may see individual branches, never try to duplicate each branch. It’s both too much work and too many stitches when dealing with overlapping branches. Simulation of the branches is just fine. If the spacing between branches needs to be more than 7 mm, I suggest switching from satin with a split stitch to Tatami with A pattern to 1 and B pattern to 0, and adjusting the Random and stitch length until the pattern starts lining up with the branches (Fig 2 on the right above). Add a jagged edge pointing downward and you will get a nice representation of the needles.
Leafy Trees (Deciduous)
When digitizing trees, do not try to do individual leaves. Here are three simple techniques:
1. Use Complex fill with Tatami stitch (Fig. 3). This can be quite boring, but if done right, can be a quick and effective approach. First, the stitch direction should be more vertical. If you stitch horizontally, it will look flat and boring. In Pulse, choose the fill pattern labeled Random. For Wilcom, go into Object Properties and select Tatami fill. Change the offset to A: 0 B: 1.00 and turn Random on 80. This will result in an organic feel.

Fig. 3
2. Determine the pattern in the tree clumps and simplify it into several groupings (Fig. 4). Play with the direction of each clumping and use satin stitching with split stitching enacted. The difficulty with this technique is making it look like one entire object and not just a bunch of clumps.

Fig. 4
3. Similar to Option 2, create clumps, but instead of using satin/split stitch, use Tatami fill with a nice Random pattern (Fig 5). With this technique, stitch all of the clumps in a similar direction. This will create clumps that are unified but still interesting.

Fig. 5
Leaves
For a traditional leaf, create a division using two different stitch directions. Stitch in a herringbone pattern (fig. 6), angling your stitches one way for one side of the leaf and the opposite for the other side of the leaf, overlapping slightly.

Fig. 6
Grass
It can be tempting to stitch every blade of grass in a design. While it can give a design depth and character, too many stitches in an area can make the design too dense and cause it to warp. My suggestion is to use a fill stitch for the majority of the area and then create a few blades of grass on top of the fill with a satin stitch. Since you are stitching green on green, you can even lower the density of the satin stitch.
Hedges and Bushes
Generally, bushes and hedges can be approached the same way as grass. I like to use a large percentage of Random in my Tatami stitch and use an offset fraction of A: .5 and B: 1.00 and a Random of approximately 80%. I also like to use a bit of jagged edge of .6 mm to give it a slight roughness. The angle should always be between 45 degrees to 90 degrees to give it loft (Fig 7).

Fig. 7
Have fun playing around with stitch type and pattern, and use True View or 3D in Pulse as a guide along the way. The more you experiment, the more you will learn.
Jesse Elliott is digitizing product manager of Artwork Source. For more information, visit artworksource.com.
Understanding the differences between machine embroidery needles and knowing which needle to use for each project will go a long way in developing your skills as a proficient commercial embroiderer.
FULL STORYWhether you’re running a small boutique embroidery shop or managing a large-scale decorated-apparel operation, attracting more customers to your business is crucial for growth and sustainability.
FULL STORYThere’s nothing more frustrating than being under pressure to get a job out and having something go wrong—and there are so many things that can go wrong!
FULL STORY