By Todd Hirschman, Adrian Ferguson, Tyler Bowman and Chris Bernat, Contributing Writers
September 22, 2015
So you really think you want to offer cut-and-sew services? You have seen the demand for customized sublimation growing all around you. You have maximized your traditional spot hit and all-over-print business and you still want more? Or maybe you are in the uniform business and you need to react to the never-ending increase in customization requests to help your business stay in step with the market.
Lots of people are talking about sublimation and cut and sew together. It sounds like a great business to enter and it may be right for you. But it is not the same as traditional embellishment. It is manufacturing and the list of tools you need to do it right is longer than that of screen printing, all-over-print dye sublimation or embroidery.
Before you do dive in, you may want to ask yourself some questions:
1. Have you reviewed the demand for this product with your current customers?
What is the price you can get for the end product? Who are you going to sell to? Who do they buy from now? Why will you win the business? Should you sub out the work for a period of time before you invest in all of the equipment? These are all questions that should be on your mind if you want to increase your likelihood of success.
2. Do you have the right team of people in place to take on the front and back end of this product?
There is a lot to this business — cutting and sewing are only part of the equation. You need a real art department and people who know how to manipulate pattern pieces so that art flows in manufacturing to maximize workflow and material. You need inventory management of trims and materials to ensure that your supply chain is in order. This requires people who understand the concept of a Bill of Materials (see sidebar). Do you know who is going to sew the work? Are they an outsource? Do they have the right machines for this type of work?
Let’s say you do have the market for cut-and-sew sublimation and you have identified the right people on your team to help it be a successful part of your business. Now let’s look at some things you need to know to move forward.
PRINT SIDE: SUBLIMATION PRINTER PLATFORM BLOTTER PAPER VICE CLAMPS HEAT PRESS PLATFORM PAPER VENDOR INK VENDOR TECHNICAL SUPPORT PLAN RIP SOFTWARE PROFILES FOR RIP SOFTWARE COMPREHENSIVE WORK ORDER FABRIC TYPES FABRIC VENDOR(S) DESIGN TEMPLATES PRODUCT PATTERNS STANDARD TIME & TEMPERATURE SETTINGS
SEWING SIDE: STANDARDIZED BILL OF MATERIALS PER PRODUCT CUTTING PROCESSES CUTTING TABLE MARKERS CUTTING TOOLS SEWING PLATFORM RELIABLE MECHANIC THREAD TYPES THREAD VENDOR(S) RECUT PROCESS QC STANDARDS DOCUMENT
Now let’s get started.
Step 1 — Get the Design Concept Right from the Customer Customers may submit their own artwork if you have provided them the templates to do so. If your art department is doing the art for them, you may want to have a designer sit with them so that they can fully grasp the customer’s concept. It’s important to get high-resolution vector art of any logos the customer may want as well as a spreadsheet that lists names, numbers and sizes for any variable data you may be adding.
Step 2 — Identify the Proper Template Templates come in all different cuts. Plackets, tanks, hoodies, jerseys, long- or short-sleeve tees all are possibilities. Once your client has decided the cut, you either will provide them with the correct template or begin the process with your own art department.
When providing your client with templates, it’s important to find out what software the client is using as well as the version he uses. You will want to provide him with the same file version so that the template layers remain in tact.
Templates should include the full range of garment sizes with each on a separate layer so that the designer easily can adjust the designs to fill out the frame of each cut piece for each size.
Step 3 — Lay It Out in Your Design Application Whether you use Adobe Illustrator, Adobe Photoshop, CorelDRAW or a combination will be determined by the style of art and the preference of the designer. Keep in mind that if your art scales with each garment size, the work required from the designer will be multiplied by the number of sizes being ordered by the customer. An order that only includes sizes small, medium and large takes much less time than an order that needs XS-3XL, regardless of quantity.
As you design for each panel, keep in mind that you allow a certain amount of tolerance between pieces. Customers need to be aware that there is an allowance where some art is lost into the seams and hems. It can be tricky creating art that has critical parts blending from one panel to the next or trying to line up elements like stripes coming off the front and back and going onto the sleeve.
If your cut includes ribbed fabric on the collars or cuffs, keep in mind that printing solid color on these pieces could produce an undesirable look when the ribbing is stretched. Having some sort of pattern or image to hide this issue is recommended.
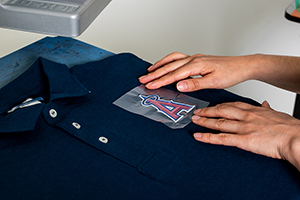
A critical part of the process is labeling each piece with text on the inside edge of the design that will be hidden in the hem or seam on a completed garment. The people sewing the garments don’t have the luxury of seeing digital file names or folder structure. Oftentimes, they are dealing strictly with cut pieces. Having the correct identifiers on each piece including garment cut, garment size, piece name, client name and design name will help them correctly assemble all of the correct pieces for each garment.
You also will want to show a mock-up that labels all of the pieces to not only help the sewer, but also help the client understand the flat pieces he is looking at.
Once the client has approved the art, the designer needs to organize the pieces in a way that minimizes paper and fabric waste while keeping the fabric grain in mind. Rotating pieces the wrong way could lead to parts of the garment stretching in an undesirable way.
Organizing your print-ready files in fabric-specific folders is an additional way of helping your printing and pressing production teams keep garments with multiple fabrics organized. Step 4 — RIP and Print So you are now ready to start printing. Load your art into your RIP software. There are several known RIP Software packages that are ideal for sublimation. ErgoSoft, Wasatch and Gans Pyro RIP are just a few of the options. Many printer companies including Roland offer a proprietary RIP as part of their solution.
You now can manipulate your order to fit the print platen. Keep in mind the orientation of the art and how it will meet up with the fabric because this will dictate which direction it can be rotated. Once you have maximized your media, name it and print your job.
This print job now goes through a RIP server that gets all the information ready for the printer to interpret and lay down some ink. Something to remember so as not to overload your RIP servers, print portions like sizes instead of full order. This will make it easier to track and will be gentle on your RIP server. If you try to load everything at once, it will take your job longer to rip and prevent you from printing smaller items or jobs to other machines. Step 5 — Transfer with Precision You have a finished roll of printed paper and now you are ready to transfer it onto your bulk-roll poly-performance fabric. There are several steps that are required to have success. Each roll press is unique so check with specific manufacturers for the best information. Once you have your materials, here is the process:
• Load preferred fabric • Load desired print roll • Unroll print onto the feeding table • Pull and drape the fabric over the print • Begin rolling blotter paper over the belt to prevent the print from transferring to the belt • Once blotter is through and is taped to the take-up reel, begin to push the fabric • Catch and tape the fabric to the backside take-up reel and move the print forward • Grab the print paper on the backside and tape to the rear take-up reel • Once all is attached, a close eye is kept on the printed fabric — attending to wrinkles, ghosting and tension troubles that can occur during rolling. • Once transfer is complete, cut the fabric (if not ended), cut excess paper and blotter. Secure with tape and send to cutting/sewing group.
Step 6 — Cutting Load your roll of fabric on a cutting table that has a rod system to hold your fabric spools in place while you pull the fabric out evenly onto the table itself.
There are automatic spreaders and cutters but you also can do this process manually. This reduces your investment. Cutting your panels manually also can be more time consuming but you get greater precision.
Whatever method you employ, be sure to keep your panels organized so that the sewer (seamstress) has every piece she needs to complete the garment. Using containers, job jackets and/or carts to move the pieces through the sewing process are ideal to prevent pieces from getting lost or dirty. It is critical to make it easy to track all the parts.
If you are manually cutting the pieces, it’s a good opportunity to proof the pieces for any printing or pressing flaws that may have been missed in the earlier steps. Keeping a detailed list of any pieces that are flawed will start the process of getting “re-cuts” created for any flawed pieces. Removing the pieces at this point will prevent wasted time sewing flawed garments and improve profitability.
Step 7 — Sewing Prep the sewing station up front and have a clear definition of what pieces are needed to assemble a garment. The sewer will refer to a Bill of Materials as a guide to assemble the garment. She also should have a mockup that displays all of the pieces making up the garment and any spreadsheets that involve customization items, such as names, numbers or logos.
When doing larger runs, it is more efficient to have several sewing stations that specialize in specific tasks grouped by stitching and thread types. Having one sewer focus on attaching panels, another doing neck tapes and another doing the hems is an example of how to streamline the process and avoid constant adjustments to the sewing machines themselves.
A finishing department with the proper equipment can add things like buttons, zippers, drawstrings or whatever other items your cuts call for. Additional tags, labels and packaging also are part of this process that help present the garment to the end customer in a professional way and make it stand out in a retail environment.
There should be one final quality-control check of the garment before it gets shipped out. Any garment that does not meet the standard should be removed and placed on a list for replacement.
All the shirts that are fit to wear….
As you can see the investment, processes, skills sets and experience needed to confidently move into cut and sew are substantial. A focused review of your market opportunity is critical to ensure your investment is appropriate. Many people who are profitable in cut-and-sew sublimation domestically started out focusing on printing and worked with an outside company to take on the sewing side of business. Outsourcing some or all of this product platform makes sense for most of the people considering it, which is why understanding the process detailed here is important to ensure you know about quality. It always is a good idea to validate the market demand before investing and this is no exception to that rule. If the market demand is there, you will enjoy great profit potential.
Todd Hirschman, Adrian Ferguson and Tyler Bowman are employees of Vapor Apparel. Chris Bernat is chief revenue officer at Vapor Apparel. He is a current board member of SGIA, and he speaks and writes on sublimation and mass customization for SGIA, ISS, FESPA and Dig South. For more information or to comment on this article, email Chris at chris@vaporapparel.com.
So, your customer returned again this year asking you to reprint their usual spirit-wear design for the upcoming football game. That’s great. But why stop there? Think of all the potential that exists for increasing your sales by taking that one design and using it to create an entire collection.
Many apparel decorators have decided to diversify their businesses, and with newer technologies being simpler to adopt, there are now more shops with more decorating choices available than ever.