In the world of apparel decoration, perceived value is what sets the bar on pricing, not a formula. People only are willing to pay what they think a product is worth. Thus, the path to higher margins is paved with creative decoration strategies and unique applications.
Digital appliqué certainly can be that ticket as it takes the 3-D texture of embroidery and combines it with the visual impact of full-color printing to create something totally different and unique.
Embroidered appliqué has been around a long time and most embroiderers have dabbled in it at some point in their careers. For most, using it as a tool for reducing stitch counts in large designs, the focus has always been on economy rather than creativity.
Certainly, appliqué has proven itself in this area, because covering a large area with fabric rather than stitches can significantly cut down the stitch count and the associated cost of a design. Of course, it’s not really that simple as appliqué generates some new costs, such as: • The cost of the fabric • The cost of cutting the fabric • The cost of applying the fabric
However, as long as you factor that in to the total production costs you will be OK and you most likely will find a cost-savings due to the reduced stitch count.
But the reality is that appliqué is a creative form of apparel decoration that can be used as an artistic tool, rather than simply as a method of stitch reduction. A big part of that is using the fabric insert to add a higher level of vibrancy and originality to the design.
Unfortunately, the fabric portion of a typical appliqué virtually is ignored during the design process, as it’s treated like filler material rather than a vital component of the overall presentation. But with the right approach, the fabric insert can add an unparalled element to the design, and literally become the core focus of the final decoration.
One approach when taking on appliqué is to consider fabrics that are a natural companion to the design. For example, if you are working with a large sailboat design, consider using appliqué for the sails, then look for a material similar to sailcloth to use in the fabric sections.
A different approach is to identify ways to bring the fabric sections themselves to life so they are a focus point rather than a background element. One method is to add embroidery details on top of the appliquéd fabric, but typically that just adds a few extra details and limited texture while doing very little for the overall design.
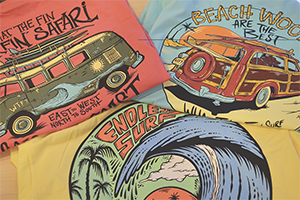
Printed fabric appliqués can have eye-opening results with very little effort and cost. Precise graphical details, vivid colors and photorealistic images all can be added into an appliqué via printed fabrics. That’s something that can’t be accomplished with embroidery alone.
For example, we used fabric with an exotic animal print for a design targeted at zoos, making the appliqué fabric the prime focus of the design. We ended up with a very simple design (embroidery-wise) that was stunning because of the unique fabric pattern. This concept was so successful that we created other appliqué designs that featured specialty print fabrics, such as nautical prints for the tourist industry.
It sounds easy enough, but there is one small complication: finding the right fabric. The reality is that most fabric stores won’t have what you need. And if you do luck out and find the right print, chances are it’s in a limited quantity and only available for a specific time. If you go directly to the manufacturers, you will find a better selection, but also will have to buy in very large quantities and even then there is no guarantee that the same print will be available when you need more. So the best solution is to create your own fabrics in-house as needed, a process I call digital appliqué.
With the low entry-level costs of sublimation and digital transfer systems, you easily can create your own custom printed digital appliqués without a huge investment. For example, an 8” x 10” full-color design can be sublimated for as low as $0.35 depending on the printer, inks and actual design details. Combine that with the reduction in stitch count by using appliqué in place of fill stitches, and you have a very cost-effective decoration that can command a significant markup due to the uniqueness of the embellishment.
DESIGN FIRST The first step for creating appliqué is the design itself. You will need to envision what part the appliqué will play in the overall design, then create the embroidery portions to support it. With any embroidered appliqué, it’s a three-stitch segment process:
Outline Stitch: A running stitch that outlines the exact area of the fabric insert. Be sure to digitize it to end at the top of the outline; this will force the sewing area to be out in front of the needle case during production, which makes for easier access when applying the fabric insert.
Tack-Down Stitch: A running stitch just inside of the outline stitch that will tack down the edges of the fabric insert.
Border Stitch: A satin or zigzag stitch that adds a border to the edges of the fabric insert to securely sew it to the garment.
Once that is done, you are ready to focus on the digital printing aspect. The first step is to determine what type of fabric you will use so you can select the proper printing process.
Polyester holds up nicely to long-term wear and tear and sublimation prints do not fade, crack, shrink or peel with multiple washings, which is definitely a plus.
Cotton, on the other hand, tends to have more of a matte finish, and possibly a textured surface as well, which provides a lot of options for fabric selection. Though typically durable in nature, cotton does have a tendency to shrink, which may affect the appearance of the appliqué over multiple launderings. In addition, it’s common for cotton inks to fade due to washing. And while digital cotton printing using inkjet transfers is advanced enough to generate high-resolution images on fabric, sublimation typically outperforms it when photorealistic images are necessary. But overall, cotton works well for digital appliqués.
PRINTING & CUTTING With digital appliqué, stick with white fabric. You will be doing a full-bleed print, so you have the ability to add any color you wish to the material via your printing. White areas of the design are simply left open (no need for white ink).
The printing process is relatively straightforward. You first will layout the image using your favorite graphics program. It’s best that you pay close attention to the overall look of the design, which means thinking about the embroidery aspects while designing the digital aspects. Make sure they are placed where there is no obstruction by the embroidery. In the case of basic appliqué shapes, it’s really no big deal. But if you are using abstract shapes or open lettering, then graphic placement details become critical.
Once you are satisfied with your design, print it out onto appropriate transfer paper and apply to the blank fabric using a heat press. When pressing is complete, discard the transfer paper and you are done with printing. If you wish to use an adhesive backing on the fabric, rather than a spray adhesive during production, apply it now.
The next step is to cut out the fabric filler so it is the right size and shape for the appliqué. One method is to export the outline stitch segment of the embroidery as a cut file (typically DXF, depending on the embroidery software) that can be used by a cutter/plotter to cut the fabric. A crude but effective alternative is to create a paper template of the appliqué section(s).
Unthread a needle on your embroidery machine and then find a way to trick your thread-break sensor into thinking that the thread is intact. It depends on the machine (On mine, I typically keep light pressure on the upper thread by gently tugging with my hand during sewing.).
Open a manila folder and hoop it by taping it to a large embroidery hoop. Run only the outline stitch portion of the design, which will sew a series of holes into the manila folder. Remove the folder and use the perforations to cut out the appliqué shape. This low-tech approach might be old-school, but it does work.
It’s time to sew. Hoop the garment, rethread the needle and set the design up to run, making sure the machine will stop after the outline stitch sews.
The standard embroidery production process looks like this:
Sew the outline stitches, then stop the machine.
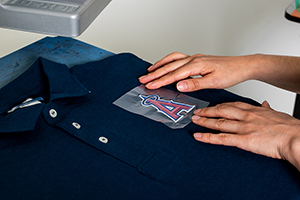
Apply the pre-cut appliqué fabric using some form of light spray adhesive or heat if using a heat-activated backing. Use the outline stitches as a reference for placement.
Sew the tack-down stitches to secure the fabric in place.
Sew the final border stitches to permanently secure the fabric in place and to give a nice finished look to the edges.
Recent technology has introduced the textile laser into many embroidery shops. The use of this cutting-edge equipment greatly simplifies the appliqué process, especially when dealing with complex shapes, multiple segments and reverse appliqué.
The laser method of appliqué production works like this:
Place the fabric swatch you just created on the garment in the proper location. No need to cut out the appliqué shape.
Sew the tack-down stitches.
Activate the laser, which will trim the fabric right to the edge of the tack-down stitches (Obviously, you have to load the design file into the laser controller.).
Sew the final border stitches to permanently secure the fabric in place and to give a nice, finished look to the edges.
Either way, digital appliqué can add a whole new level of excitement and creativity to any garment and/or logo. And best of all, it commands decent markups, while setting you apart from the competition.
Award-winning author and international speaker Jimmy Lamb has more than 20 years of apparel decorating experience. He currently is manager of communications for Sawgrass Technologies, Charleston, S.C. For more information or to comment on this article, email Jimmy at jlamb@sawgrassink.com.
So, your customer returned again this year asking you to reprint their usual spirit-wear design for the upcoming football game. That’s great. But why stop there? Think of all the potential that exists for increasing your sales by taking that one design and using it to create an entire collection.
Many apparel decorators have decided to diversify their businesses, and with newer technologies being simpler to adopt, there are now more shops with more decorating choices available than ever.