Decorated-Apparel Transfer Printing with DTG
Today’s decorated-apparel professionals can dramatically expand their design and product offerings to include direct-to-film (DTF) with an existing direct-to-garment printer.
FULL STORY
When troubleshooting a problematic print that is done on a digital direct-to-garment printer, experience is, by far, the most valuable tool in your toolbox. I’ve also found my screen printing experience to be of worth.
After screen printing for 25 years, I can troubleshoot a screen printed design in seconds. Now, I’ve transformed that experience into digital printing. Troubleshooting will be harder if you have no experience or benchmarks from previous history.
In the beginning, my shop developed a procedure to follow whenever we knew something wasn’t right, but we didn’t have a clue what was wrong. This process includes first checking the substrate, then the nozzles, then whether we made any changes in the parameters and, finally, the artwork.
SUBSTRATES & PRETREATMENT
One of the first things you should remember is that you have to be wary of the print jobs you accept and the substrate on which you intend to print. If you want to save time, and prevent hassles and frustration, become familiar with brands that print well for you and stick to those brands. In our shop, we will not digitally print anything except 100% cotton T-shirts, and we are very firm about that. You can shut down your shop trying to print substrates never intended for digital printing. We recommend certain brands and we discourage certain blends, like 50% cotton/50% polyester.
If we get customers who absolutely insist we print on 50/50 blends because it’s the only option available in a specific color, we require them to sign a document ahead of time that states the risks involved, and that this shirt is not the best choice. We ensure that customers are aware in advance that the results may not be what they are expecting.
Shirt brands also greatly affect pretreatment, and the proper amount will vary depending on the brand and its country of origin. In some instances, you may have to experiment with a shirt to see what works best. In some cases, we invested our own time and money into doing test prints to ensure a customer would be happy.
The most important aspect of pretreatment application is consistency, which is difficult to achieve when using a spray gun. If the same person is doing it every time, he may develop an intuitive sense of how much pretreatment will suffice. Still, it is, at best, an educated guess. If you have multiple people pretreating garments, each person will most likely do it differently and with varying amounts.
For this reason, an automatic pretreatment machine is a worthy investment. It allows you to apply a consistent layer of chemical. Industrial equipment has the pretreatment process already built in so that it’s not an issue.
When pretreatment is not done properly, the most obvious sign will be inconsistent color. Inadequate pretreatment causes poor opacity, which results in bad color. That’s easy to troubleshoot because it’s so visible. It becomes even more obvious when you wash the shirt because the inks will come out.
Another troubleshooting issue related to pretreatment is the hand or feel of the garment. An inconsistent pretreatment layer can result not only in washed-out portions of the design, but it also can result in a rough or uneven hand.
Poorly executed pretreatment also can result in fibrillation. There has to be enough pretreatment applied to make sure that the substrate’s fibers are sealed down. This holds true whether the shirt is being cured in a heat press or a conveyor dryer. I’d estimate that 90% of the time, the wet shirt looks great, but the real results are apparent after the shirt has been cured.
NOZZLE & SETTINGS CHECKS
Once you’ve eliminated the shirt or pretreatment as possible causes of a problem, the next step will be to check the nozzles. Most equipment has a diagnostic function that allows you to do this. You should ensure that all nozzles are firing. We routinely run nozzle tests before the day starts.
Nozzle checks are even more important if unfavorable conditions, such as low humidity or high heat, exist in your shop. On these days, we immediately run nozzle tests if we suspect any issues.
If a nozzle check indicates any issues, the next step is to run several purge cycles on the machine. If you find a clogged nozzle, it must be cleaned. Sometimes a purge will clean it out. Other times, you may have to flush the print heads, which can take hours.
Typically, you will experience the worst problems with the white print heads because the titanium dioxide in white ink has a heavy settling rate. This pigment settles quickly due to its weight and tends to easily clog heads and lines. Constantly monitor your nozzles so you are always aware of their status. Some machines have settings that will allow you to compensate for clogged nozzles by overriding the non-firing ones.
The good news is that, in most cases, nozzles get clogged at a gradual rate. This means there are some warning signs that allow you to act before the problem gets out of hand. One of the first indications of a clogged nozzle is streaks in the print, and it becomes more evident as the clogging increases.
The third area to check for printing problems — if you are dealing with a repeat order — is changed settings. This is where good documentation comes into play. You must keep track of all the parameters for each job you do. At my shop, all specifications for a job are entered into a standardized work order by the machine operator. That order is kept on file. This makes it easy to double check that we are using the same settings as in the past for the same job.
It’s not unusual to have a job that was printed, the customer was happy, and he comes back for more. You print the job again, but this time it doesn’t look quite right. This is why it’s critical to have written records of exactly how you previously printed the job and its associated expectations.
Details that should be documented include how the ink saturation deposits were altered, the printing mode (high quality or low quality), how the white ink was laid down and how the pretreatment was applied.
ARTWORK
The final area to check is artwork. People tend to create art in a substandard application, such as a Microsoft Word file, a publisher file, or they provide you with a low-resolution jpeg. As a shop owner, you have to decide whether you will offer services to fix bad art. If you have a policy to print only art created in-house, you solve a lot of issues created by bad artwork, but you are eliminating 90% of your business.
When we get artwork from customers, we always do a preflight check (proof) in Adobe Photoshop before we start the job. Someone who understands resolutions and the ripping software used to process print jobs must do this. Everything should be checked for errors. If errors exist in the pixel data or the file is corrupt, this may not be visible to the naked eye and will cause problems when the file is being ripped. Knowing how to address these issues is a product of experience. This is why I stress the importance of knowing graphics software.
Other issues that can arise in artwork may involve small type or trying to hit a particular color. Sometimes, you can get jagged edges or poor registration due to bad pixel data. When printing on darks, the underbase often will hang outside of the CMYK. You must have a comprehensive knowledge of your graphics software to be able to fix such problems.
These areas touch on the most common troubleshooting issues you will encounter. Every shop and machine is different, and every digital decorator is bound to run into some unique problems. If you use this four-step procedure, it can help you narrow down the cause of your problems so you can figure out a solution more quickly. And, if you are diligent about documenting the problem and its solutions, you will soon find that time spent in troubleshooting is reduced, and you can consistently output the print quality that your customers will expect.
Kevin Kelly has been involved in decorated apparel for more than 34 years. He opened his current business, Blue Heron Industries Inc., in Little Falls, N.J., in 2002. For more information or to comment on this article, email Kevin at kkelly@goblueheron.com or visit goblueheron.com.
Today’s decorated-apparel professionals can dramatically expand their design and product offerings to include direct-to-film (DTF) with an existing direct-to-garment printer.
FULL STORYThe past few years have brought changes to almost every industry, and decorated garment production is no exception.
FULL STORY
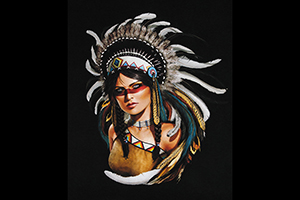
New Jersey-based Breakthrough Custom Clothing created “Warrior Princess” from scratch by digitally hand drawing the entire piece.
FULL STORY